Sunday, 26 February 2012

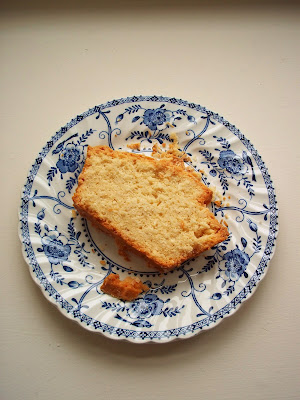
Gluten Free Coconut Loaf

This lovely rustic coconut cake is just the thing to accompany a good cup of tea. Go on, let yourself bite into a warm crumbly slice. My favourite kind of country cake: sweet to eat, simple to make.


Recipe
Adapted from a recipe from a tiny book by Marks and Spencer called Easy Baking.


Serves 8

pinch of salt
225g gluten free self raising flour, sifted (Dove's Farm recommended)
115g unsalted butter
115g demerara sugar
100g dessicated coconut, plus extra for decoration
2 large eggs
4 tablespoons milk

1. Turn oven to 160C (140C fan ovens), and grease and line a 2lb loaf tin.

2. Combine the sifted flour and salt in a large bowl, and rub in the butter until the mixture is the consistency of breadcrumbs.

3. In a smaller bowl, lightly beat the eggs until frothy.

4. Next add the beaten eggs, along with the sugar, coconut and milk, to the flour and butter, stirring gently until combined. If the mixture is too doughy, add a little more milk until it is a dropping consistency.

5. When the batter is ready, spoon it into the prepared loaf tin, and place in the oven for 30 minutes. After this time, quickly take it out and sprinkle more coconut over the top of the cake before placing back in the oven to bake for approximately another 30 minutes. You'll know the cake is done when the top is golden and a skewer comes out clean.


6. Leave to cool in the tin for 15 minutes, before placing on a wire rack to cool further.

7. Eat warm or cold, with your favourite cuppa. We ate ours while watching the bonfire we'd just made. Cake after physical labour tastes fabulous.


This cake was idly baked while listening to Johnny Cash sing American IV: The Man Comes Around

Friday, 24 February 2012

Carrot Cake

There's nothing more homely, tasty and comforting than a good Carrot Cake, and this one by Paul Hollywood is a real corker, being moist, subtly sweet, and just the right amount of nutty. Like any cake using cream cheese icing, I'd advise you to keep it in the fridge, but if your family is anything like mine then it won't last long in there!


Barely adapted from the recipe by Paul Hollywood in the March issue of Delicious Magazine. Available in newsagents now. see more recipes at Delicious Magazine online here.

Serves 8


for the cake bases:
125ml sunflower oil
230g plain flour
1 teaspoon baking powder
230g light muscovado sugar
1 and a half teaspoons cinnamon
half a teaspoon ginger
half a teaspoon mixed spice
100g walnut halves
260g carrots, grated
grated zest of half a large orange
3 large eggs


1. Turn oven to 180C (160C fan ovens). Grease and line two 18cm round cake tins.

2. Sift the flour, baking powder, and cinnamon, ginger and mixed spice into a large bowl.

3. Add the sugar, walnuts, grated carrot and grated orange zest and stir to combine.

4. In a smaller bowl, whisk the 3 eggs until light and frothy, then add them to the cake batter.

5. Next add the sunflower oil, and mix until well combined.

6. Pour the batter equally into the prepared baking tins, and bake in the oven for about 50 minutes. You'll know it's done when the top bounces back under your finger, and a skewer comes out clean.


7. Leave to cool in the tins for 10 minutes, before carefully turning the bases out onto a wire rack or plates to cool further.


for the icing:
50g unsalted butter, room temperature
150g icing sugar
200g cream cheese
2 teaspoons freshly squeezed orange juice

8. To make the icing, beat the butter in a large bowl, then mix in the cream cheese, beating well.

9. Sift the icing sugar into the mixture, along with the orange juice. Don't do what I did and idly misread the recipe, adding tablespoons instead of teaspoons (to recover the consistency I had to add more icing sugar). Continue to beat until the icing coheres smoothly. Place the bowl in the fridge, covered with a plate, until you're ready to use it.

10. When the cake bases have cooled completely, spread the top of the first of the bases with a third of the icing, and place the other base ontop. Cover the top and the sides of the second cake with the rest of the icing, decorating it with more walnuts, or a wafer rose and cream cheese leaf as I did.


This cake was idly baked while listening to Ella Fitzgerald's album Music & Moonlight

Sunday, 19 February 2012

Banana & Chocolate Pancakes


Ok, so I could have worked harder to make this dish look more like the pristine, polished pancakes you find in food magazines and restaurants. I could have picked the prettiest pancake to photograph, and folded the banana neatly inside. But let me tell you, it took all my self control to stop myself instantly tucking into this, the last banana and chocolate pancake of the afternoon, and to take any photograph at all. The combination is utterly scrumptious. Warm, soft, caramelised bananas in their syrup, spread over a golden pancake and drizzled with melted dark chocolate. Glorious.


Adapted from a recipe given by Riverford Farm, the brilliant local organic veg & fruit box delivery scheme we use. See the recipe on their website here.

Makes about 6 pancakes

for the pancake batter
100g plain flour
1 large egg
300ml whole milk


1. Sift the flour into a large bowl. Make a well in the centre of the flour.

2. Break the egg into the well, add a spoonful of milk before beating the mixture. Gradually add the milk and continue beating until smooth. The finished batter should be no thicker than single cream. Cover the bowl with a plate and cool in the fridge for at least 30 minutes, ideally 1 hour.

3. When ready to cook, stir the batter again briefly. Heat a little oil in a large light frying pan over a medium heat, and wait until the oil is just beginning to steam. Stand back as you add a cupful of the batter to the pan, tiping it around the pan to make sure it covers the base in a thin layer.

4. Cook the pancake for about 1 and a half minutes, until the edges are going golden and coming away a little from the pan.

5. Loosen with a spatula, and then flip the pancake over and hold your breath as you catch it! Or if that's too scary an idea, turn it over with a fishslice if you prefer. Cook the pancake for about another minute, until the edges are crisping and both sides are turning golden. The first pancake is normally the most haphazard. Repeat to make as many pancakes as you'd like.


for the banana filling:
3 or 4 ripe bananas, peeled and cut half lengthways
60g unsalted butter
3 tablespoons caster sugar


6. Melt the butter in a low heat in another frying pan, before throwing in the sugar and bananas.

7. Heat until the bananas are starting to caramelise and are soft and golden.


for the melted chocolate:
100g dark chocolate, broken into chunks


8. Gently melt the dark chocolate chunks in a bain maire, a heat proof bowl over a pan of just simmering water.


9. Place a banana with the syrup inside each pancake, before folding the pancake into a half moon. Alternatively do what I do and just lay the bananas and syrup over each pancake. Drizzle each pancake with the melted chocolate. Eat immediately!


These pancakes were idly made while watching the documentary Man On Wire. If you think tossing pancakes is difficult, just you watch Phillippe Petite walking on a wire between the tops of the Twin Towers in 1974.


Wednesday, 15 February 2012

Gluten Free Chocolate & Roasted Hazelnut Brownie Cake

Take no notice of the unassuming cracked exterior of this cake. Inside there lies the most rich and beautiful tasting nutty brownie cake. Moist and soft in the middle with nuggets of chocolate and crunchy slivers of hazel, this is definitely my cake crush of the week. If you're not gluten intolerant then you can use plain flour instead of the gluten free mix. Next time I'm planning on adding an extra egg to make a bigger cake for even more eating potential....


Recipe
Adapted from the brilliant recipe at the BBC Good Food website. See their original recipe here
Serves 8

175g unsalted butter, room temperature
225g dark chocolate, broken into pieces
65g gluten free plain flour (Dove's Farm or M&S recommended)
200g golden caster sugar
3 large eggs
50g hazelnuts

1. Turn the oven to 180C (160C fan ovens), and grease and line a 20cm cake tin.


2. When the oven is up to temperature, place the hazels on an oven tray and bake for approx 4 minutes to roast them. Take out of the oven and leave to cool, before removing their skins and cutting the nuts into small pieces.


3. Heat the butter, sugar and 175g of the chocolate in a bain mairie, a heat proof bowl over a pan of just simmering water. Stir gently until the ingredients have melted together. Take off the heat and leave to cool in the bowl.


4. Add the egg yolks to the chocolate mixture, beating well until combined. Then, using a wooden spoon, stir in the flour, chocolate chunks and roasted chopped hazels


5. In a separate bowl beat the egg whites until fluffy, before very gently and briefly folding them into the rest of the ingredients.


6. Pour the batter into the prepared cake tin, and bake in the oven for approx 40 minutes, until the top has cracked and bounces back under your finger.


7. Leave the cake to cool in the tin for 15 mins, before placing on a wire rack or plate. Once cool, dust liberally with icing sugar and serve with double cream.


This cake was idly baked to the sounds of The Black Saint & The Sinner Lady by Charles Mingus


Saturday, 11 February 2012

The Hummingbird Bakery Red Velvet Cupcakes

I have mixed feelings about St. Valentine's Day. If done right it can be a sweet love celebration, a ray of sunshine when life is cold and grey and spring a distant hope. On the other hand, it has always seemed an unfair and prejudiced celebration, catering as it does only to couples. I know some amazing folk who through no fault of their own haven't met the person they want to be with yet. Why should they miss out on the fun of the day just because they're single? Taken from the Hummingbird Bakery cookbook, these cupcakes are for everyone, whether in love or not, a heavenly recipe to bring us all a little idle joy. Just halve or quarter the quantities if you're planning these as a solitary pleasure.


Recipe
Makes 12 medium sized cupcakes
Adapted from the lovely recipe by the Hummingbird Bakery cookbook. Buy the book on Amazon here. Or you can see the recipe online at www.goodtoknow.co.uk here


for the base:
150g golden caster sugar
60g unsalted butter, room temperature
1 free range egg, room temperature
10g cocoa powder
red colour tint, or 20ml red food colouring liquid
half a teaspoon vanilla extract
120ml buttermilk (or 60ml milk & 60ml runny natural yoghurt)
150g plain flour
half a teaspoon bicarbonate of soda
half a teaspoon salt
1 and a half teaspoons white wine vinegar


1. Turn the oven to 170C (150C fan ovens) and place medium sized cupcake papers in a 12 cupcake baking tin.

2. In a large bowl, cream the butter and sugar for at least 3 minutes until fluffy.

3. Add the egg, and beat well until combined and smooth. 

4. Meanwhile in a second, smaller, bowl, stir the cocoa powder, red colouring and vanilla extract together.

5. Mix these 3 ingredients into the batter. It will turn a bright red, which will come out darker once baked.

6. If you can't find any buttermilk in the shops, you can make your own as I did by mixing the milk and natural yoghurt, which works just as well.
When it's ready to use, add half the buttermilk or milk and yoghurt combination to the batter, before throwing in half the flour and mixing thoroughly.

7. Next add the rest of the buttermilk and the rest of the flour, beating again until smooth.

8. Carefully stir in the salt, bicarb of soda and vinegar, and then beat the mixture on a high speed for a few more minutes.


9. Spoon the batter into the cupcake cases, filling until three quarters full.

10. Bake in the oven for 20- 25 minutes. You'll know the cakes are done when the tops bounce back under your finger and a skewer comes out clean.

11. Transfer the cupcakes in their cases to a wire rack or plate and leave to cool completely.


for the cream cheese icing:
50g unsalted butter, room temperature
300g icing sugar
1 drop vanilla extract
125g cream cheese, cold

12. To make the icing, beat the icing sugar and butter together thoroughly.

13. Next add the cream cheese, and continue to mix well.

14. Add the drop of vanilla extract, then beat the icing hard for 5 minutes until fluffy and ready to pipe.

15. To pipe the icing, get a pint glass. Place a piping bag with a nozzle inside the glass, so that the nozzle is on the bottom of the glass. Fold the piping bag edges over the glass rim. Spoon the paste into the piping bag, then carefully take the bag out of the glass and twist the end of the bag so that the icing is well contained.

16. Pipe the icing over the cupcakes and add any sprinkles or sugar flowers you fancy to decorate. To pipe a rose, you start piping in the middle of the cupcake and work outwards. To pipe a classic swirl, you start piping at the outer edge of the cupcake and work inwards.


These cupcakes were idly baked while listening to Jarvis Cocker interview Leonard Cohen on BBC Radio 6 Music.

Saturday, 4 February 2012

Cinnamon Pear & Amaretti Pie for Valentine's Day

This double crust pie tastes and looks sublime. Spiced cinnamon pears in sugar and crushed amaretti are encased in shortcrust pastry, and topped with a decadent slathering of sweet rose buttercream icing. Delicious glamour for those planning a romantic Valentine's Day meal for an immensely greedy couple!


Recipe
Barely adapted from the recipe by Tamasin Day Lewis's book Tarts with Their Tops On. Buy the book on Amazon here.
Serves 4-6

for the pastry:
340g flour
170g unsalted butter, cold and diced

for the filling:
8 pears, peeled, cored and sliced
light muscovado sugar
lemon juice
12 small amaretti
quarter teaspoon cinnamon


1. To make the pastry, sift the flour into a large bowl, adding the cold diced butter and work quickly to rub it into the flour using the tips of your fingers.

2. Add 4 or so tablespoons of cold water, stirring in just enough to bind the dough. Gather into 2 balls, one slightly larger than the other, and wrap in clingfilm. Place in the fridge for at least 30 minutes.

3. Meawhile turn the oven to 200C (180C fan ovens) and grease a deep 23cm pie tin.

4. When ready, scatter some flour on the work surface to prevent sticking, and roll out a little over half the pastry. With cold hands, start rolling the pastry with a rolling pin, rolling away from yourself and turning the pastry as you continue.

5. Line the greased pie dish with a little over half the pastry. Place in the fridge, along with the leftover pastry ball, until the filling is ready.


6. In a large bowl, toss the pear slices in lemon juice to stop them browning and lots of light muscovado sugar.

7. Next crush the amaretti by double bagging them in plastic bags and beating the bags with a rolling pin - most cathartic if you're having a stressful day! 

8. Add the crushed amaretti and cinnamon to the pears. Spoon the mixture into the lined pastry tin.

9. Roll out the rest of the pastry into a lid, and cover the pie. Using the leftover pastry pieces, cut out a large heart to decorate the top, making a small hole in the centre of the pie to let the steam out. Sprinkle with caster sugar the areas on the top that won't be covered with the buttercream.

10. Put in the oven for 15 mins, and next turn down the oven to 180C and bake for 30 minutes more until the pie and fruit are done.


for the icing:
2 tablespoons caster sugar
55g unsalted butter
3 tablespoons or 1 teaspoon rose flower water
110g icing sugar

11. To make the icing, throw all the ingredients except the icing sugar into a pan over a medium heat. Once at boiling point, take off the heat.

12. Pour the melted mixture over the sifted icing sugar in a bowl, and beat until smooth.

13. With a palette knife, slather the rich rose buttercream icing over the heart on the warm pie, or over the entire top if you've a very sweet tooth. Serve tepid, with whipped cream and a ball of any extra rose buttercream.


This pie was idly baked while listening to Jimi Hendrix's album Electric Ladyland