Showing posts with label Lemon. Show all posts

Friday, 3 August 2012

White Rabbit, Rose & Lemon Marble Cake


Welcome to the recipe for White Rabbit, Rose & Lemon Marble Cake! There's no need to give this cake too much description, as the White Queen did such a good job of it in the Mad Tea Party post. Suffice to say it is a delicious and oh so pretty party cake, with a moist flavoursome crumb, and a psychedelic glamour all of its own.


Recipe
My own
Serves 10-12


For the white chocolate rabbits and roses:
approx 350g white chocolate, broken into pieces


1. Make the chocolate rabbits and roses in advance. Gently melt 250g of the chocolate over a bain mairie, a heatproof bowl over a pan of just simmering water. Stir the chocolate, and when melted, add the extra 100g, taking it off the heat but continuing to stir until melted.

2. When all the white chocolate has melted smoothly, carefully spoon it into the silicone moulds (I got roses one from Lakeland; the rabbit one from Baked & Delicious magazine). Place the filled moulds on a plate in the fridge for half an hour, before unmoulding. Don't touch them too much when unmoulding as the heat of your hands may soften them. When unmoulded, place the mice back in the fridge on a plate until ready to use.


for the marble cake:
250g unsalted butter, room temperature
250g caster sugar
250g self raising flour
4 eggs
1 large drop of rose water, for rose batter
1 large drop of lemon extract, for lemon batter
1 pin prick pink colour tint paste, for rose batter, I used Ruby by SugarFlair
1 pin prick yellow colour tint paste, for lemon batter, I used Primrose by SugarFlair


3.Turn the oven to 180C (160C fan oven). Grease a 20cm round baking tin and line the bottom with baking paper.

4. Cream butter and sugar together for at least 3 minutes in a large bowl until fluffy.

5. Add the first egg and a tablespoon of the flour, and beat well until smooth. Repeat the process with the other two eggs one after the other, adding a little flour with each and beating until smooth.

6. Then divide the batter evenly into two bowls. To one half of the batter add the lemon flavouring and the yellow colouring, and mix together gently with a metal spoon.

7. To the second bowl of batter, add the rose flavouring and the pink colouring, mixing until combined as before.

8. Dollop spoonfuls of each batter, one after the other, into the prepared baking tin. When all the mixture has been used up, swirl once around the spoonfuls of batter with a skewer.


9. Bake in the oven for about 50 minutes. You'll know it's done when a skewer comes out clean.


10. Remove from the oven and leave the cake in its tin for 20 minutes before carefully turning it out onto a wire rack or a plate to cool.


for the icing (this makes more than enough, so there'll be spoonfuls of leftovers for licking!):
500g icing sugar
160g unsalted butter, room temperature
50ml whole milk
2 drops vanilla extract

11. Once the cake is cool, you can make the icing. Slowly beat the icing sugar and butter together using a food mixer or a handheld electric whisk until they are well combined.


12. In a separate bowl, mix the milk and vanilla together.

13. Add a couple of spoonfuls at a time of the vanilla milk to the icing, mixing well.

14. When all the vanilla milk has been added, beat the mixture quickly, and continue beating for a minimum of 6 minutes, until the icing is fluffy and light.

15. When you're happy with the consistency of the icing, spread it over the top and sides of the cake with a spatula or palette knife.

16. Before the icing starts to harden, quickly place the white chocolate rabbits and roses into the icing, pressing them in firmly so that they stay put. Place the cake in the fridge for 20 minutes, then take out at least 5 minutes before serving at room temperature.


This cake was idly baked while listening to Edith Sitwell sing William Walton's Facade


Sunday, 20 May 2012

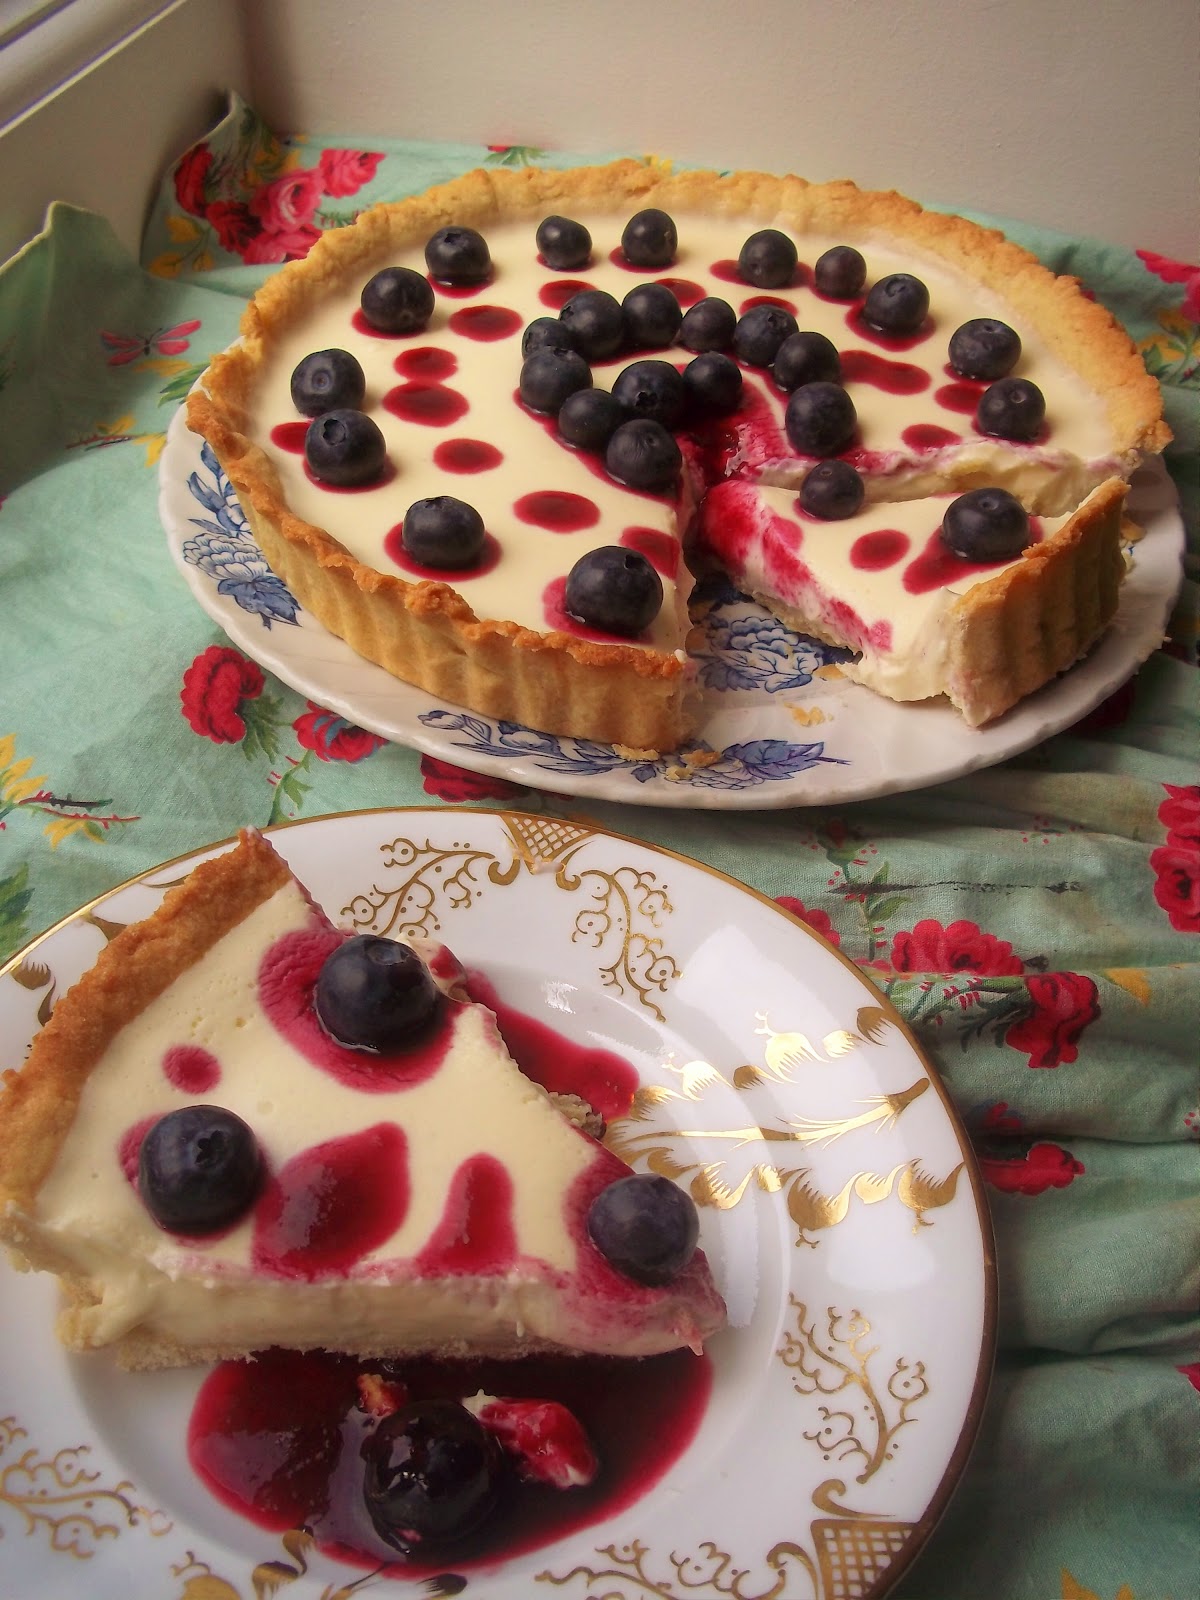
White Chocolate, Blueberry & Lemon Mascarpone Tart


Mr Eve likened this bake to how he likes his women: sweet, zesty, beautiful and tarty! I'm not complaining at the comparison, for this delicate, rich and summery tart is my most delicious yet. The flaky pastry compliments an unctuous mascarpone filling, whilst a zingy blueberry sauce cuts through the sweet creaminess of the white chocolate, enhancing and balancing the flavours.

This is one of those recipes that's best made the day before and brought out when you're ready to wow. Bear in mind that as it contains an unbaked filling, you'll need to keep the tart in the fridge before and after serving.


Recipe
Pastry recipe adapted from the one for Strawberry Tart by Alison Walker in the latest Country Living Magazine (June 2012), filling inspired by hers also. To buy the magazine and see more recipes, visit their website here: www.countryliving.co.uk  You can also buy the magazine at all good UK newsagents this month.


Serves 8-10

for the sweet shortcrust pastry:
225g plain flour
100g cold unsalted butter
2 tablespoons caster sugar
half a teaspoon of ground nutmeg
1 large egg, beaten


1. To make the pastry, quickly cut the cold butter into into small pieces. In a large bowl, combine the butter and flour, rubbing it in with your fingertips. Alternatively if you have a food processor then you can whizz them together briefly. Either way you want the mixture to be the consistency of fine breadcrumbs.

2. Mix in the sugar and nutmeg, before adding the egg, stirring gently until the mixture begins to cohere.

3. Place the pastry on a floured board, kneading it and adding a few drops of water if need be to encourage it to cling together.

4. Gather into a ball and wrap it with cling film then place in the fridge for 30 minutes.

5. After this time, roll the pastry out onto the floured board, rolling gently until it's the thickness of a 1 pound coin. Add a little more flour if the pastry starts sticking to the board. Get ready a deep 20cm tart tin with a removable base.

6. Carefully roll the pastry up over the rolling pin to help you place it onto the tart tin. Gently press the pastry into the base and sides of the tin and prick the base with a fork. Chill for 10 minutes in the fridge.


7. Turn the oven to 190C (170C fan ovens). Cover the base and sides of the pastry case with baking paper, and then fill the base with ceramic baking beans (or dried beans if easier). Bake in the oven for about 12 minutes until the pastry is set.

8. Remove the baking beans and paper, and bake for another 5-10 minutes until the pastry is sandy to touch. Then take out of the oven and leave to cool in the tin on a wire rack. When cool, remove the pastry case from the tin and place on a plate.


for the filling:
250g mascarpone cheese
100g white chocolate, broken into small pieces
2 tablespoons golden syrup
150ml double cream
finely grated zest of 1 lemon

9. To make the filling, gently melt the mascarpone, chocolate and syrup together in a bain mairie (a heatproof bowl over a pan of almost simmering water). Stir briefly when the mixture has melted, then take off the heat and put to one side to cool.

10. Whip the double cream lightly, until it has the same consistency as the mascarpone mixture.

11. Next fold in the lemon zest, and stir, followed by spoonfuls of the double cream. Fold in the rest of the double cream.

12. Carefully pour the filling into the cool pastry case, and place in the fridge to chill overnight.


for the blueberry sauce:
juice of 1 large lemon or 2 small ones
200g blueberries, washed and dried
2 tablespoons golden syrup


13. For the blueberry sauce, heat the lemon juice, syrup and 100g of the blueberries in a pan. Bring to the boil, then simmer for 3-4 mins, stirring occasionally. Taste the sauce, and add a dash more lemon juice if needed.

14. Next you can either use a liquidiser, or do what I did and mash the warmed mixture with a potato masher so that the blueberries have burst all their juices. Stir again, then pass the mixture through a fine sieve with a bowl underneath to catch the sauce. Put the sauce to one side to cool briefly.

15. Finally, take the tart out of the fridge and decorate it with blueberry sauce, plus the remaining blueberries. Serve immediately, with more sauce on the side.


This tart was idly baked while listening to Nick Drake's album Bryter Layter


Saturday, 31 March 2012

Elderflower & Lemon Easter Cupcakes


Let me show you these super easy cupcakes, which I made last spring before the idle blogging had begun. Sweet and fresh tasting, they're light on the tongue, and - dare I say it - very moreish! A lovely contrast to all the big chocolate eggs and rich cakes of Easter.


Recipe
My own recipe.
Makes 12 medium muffin-sized cupcakes

125g self raising flour
1 teaspoon baking powder
125g unsalted butter, room temperature
2 large eggs, room temperature
125g caster sugar
finely grated zest of 1 small lemon
1 tablespoon elderflower cordial

1. Turn the oven to 180 (160 fan) and place large cupcake cases in a 12 muffin baking tray. Cream the butter and sugar together in a large mixing bowl, until smooth and fluffy.

2. Add the eggs one at a time and beat in. Then pour in the lemon zest and tablespoon of elderflower cordial, stirring well.

3. Next sieve the flour and baking powder into the mixture, stirring gently until the batter is combined.

4. Spoon the batter into each cupcake case, until they are approximately two-thirds full (you want to leave enough room for the cakes to rise).

5. Place in the oven for 20 minutes. You'll know the cakes are done if a skewer comes out clean.

6. Take out of the oven and leave for a few minutes, before moving the cupcakes in their cases to a wire rack or plate to cool.


for the icing:

1 or 2 teaspoons of elderflower cordial
100g butter
100g cream cheese
410g icing sugar
food colouring - at the time I used liquid pink colouring, which made the icing a bit too runny, so now I'd recommend tint pastes (such as Dusky Pink by Sugarflair) 
mini chocolate eggs, little chicks, sugar flowers or anything else you fancy to decorate


7. Combine the butter and cream cheese. Stir in the teaspoon or 2 of elderflower cordial and mix together.
 
8. Sift half the icing sugar into the mixture, and stir thoroughly, before adding the other half and continuing to stir until it is a thick paste. Take care stirring the icing sugar, as this is a bit messy, I tend to wear an apron as I've been known to accidentally drench myself in it when stirring too vigorously!

9. When the icing is combined, the only thing left to do is to colour it. With colour tint pastes you only need to add a pin prick amount before stirring it in to give the icing a beautiful pastel colour.
 
10. Get a pint glass (or 2 if you're icing 2 different colours, in which case just follow the same method for each individual colour). Place a piping bag with a nozzle inside the glass, so that the nozzle is on the bottom of the glass. Fold the piping bag edges over the glass rim. Spoon the paste into the piping bag, then carefully take the bag out of the glass and twist the end of the bag so that the icing is well contained.

11. Pipe the icing over the cupcakes and add any mini chocolate eggs, sugar flowers and chicks you fancy to decorate.


I idly baked these whilst looking outside at the gorgeous spring blossom in the garden last easter.

Friday, 23 March 2012

Gluten Free Sticky Lemon & Poppyseed Cake


This is a beautiful gluten free cake: fluffy and moist, with a sticky lemony topping and a crunch of poppyseeds in the crumb. Best eaten at tea time with a good cuppa and the sun on your face.


Recipe
My own recipe.
Serves 6-8

for the cake:
3 large eggs, room temperature
50g poppyseeds
200g golden caster sugar
200g unsalted butter, room temperature
200g gluten free self raising flour mix (Dove's Farm recommended)
100ml creme fraiche
Finely grated zest and juice of 1 small lemon
1 handful demarara sugar


1.Turn the oven to 170C (150C fan oven). Grease a 20cm round baking tin and line the bottom with baking paper.

2. Cream butter and sugar together for at least 3 minutes in a large bowl until fluffy.

3. Add the first egg and a tablespoon of the gf flour, and beat well until smooth. Repeat the process with the other two eggs one after the other, adding a little flour with each and beating until smooth.

4. Throw in the lemon zest, and the lemon juice. Stir into the butter mixture, before adding another spoonful of the flour, the poppyseeds and the creme fraiche. Stir gently until combined, before throwing in the rest of the flour. Gently mix with a metal spoon.

5. Pour into the baking tin, before sprinkling the demerara sugar ontop.  Bake in the oven for 40-45 mins. You'll know it's done when a skewer comes out clean and the cake springs back under your touch. The top may have cracked a little, which is part of its charm.

6. Remove from the oven and leave the cake in its tin for 20 minutes before carefully turning it out onto a wire rack or a plate to cool.


for the lemon syrup:

juice of 2 small lemons or 1 large one
100g caster sugar

6. Heat the lemon juice and sugar gently in a saucepan, until the sugar dissolves. Stir and take off the heat.

7. While cake is still warm, pour the syrup over the cake and decorate with more grated lemon rind or anything else you fancy! Bear in mind if you're adding cut daisies as I did, that these are not edible flowers so should be placed over the lemon rind and not touch the cake itself.


This cake was idly baked while listening to Radiohead's album In Rainbows.

Wednesday, 14 December 2011

Gluten Free, Dairy Free Christmas Fruit Cake: Murrambidgee Cake

I have a confession to make: I hate Christmas cake. Can't stand the stuff. The dense claggy crumb, the overly sweet marzipan and royal icing, it's just never done it for me. Not to mention all that hoopla with baking the cake a month in advance, soaking the fruit and rolling the marzipan and cutting pristine holly leaves out of ready to roll icing. It's a cake to be baked by a perfectionist baker, not an idle one.

So instead I've been searching my cookery books to find the perfect festive fruit cake, one that's quick and easy to make and scrumptious and subtle to taste. This wonderful recipe by Sophie Grigson is ideal, a family favourite created by her mother the great food writer Jane Grigson, which tastes gorgeous whether made on Christmas Eve or a week before. It's surprisingly healthy, consisting more of fruit and nut than cake. I've turned it gluten free and made a few other adaptations to use up our store cupboard glace fruit and nuts, but this is still very much the Murrambidgee cake of the Grigson family fame.


Recipe
Adapted from the recipe in Sophie Grigson's book The Country Kitchen. Buy the book on Amazon here

Serves 10-12

150g walnut halves
50g whole almonds
50g whole hazelnuts
50g pistachio nuts, shelled
50g pine nuts
250g stoned halved dates, or 100g sultanas & 150g dried peach halves
175g glace cherries
100g seedless raisins
100g chopped candied peel
finely grated zest of 1 lemon or lime
100g gluten free flour mix (Dove's Farm or M&S)
half a teaspoon baking powder
half a teaspoon salt
150g caster sugar
1 teaspoon vanilla extract
3 large eggs
half a tablespoon thin honey
brandy or rum

1. Turn the oven to 150C (130C fan ovens). Grease and line a round 20cm baking tin.

2. Roast the hazels, almonds and pistachios for 10 minutes in the oven, then leave to cool before rubbing the skins off the hazels.

3. Chop the nuts and dates or peaches in half.

4. In a large bowl, mix all the nuts, candied peel, lemon zest and fruit together. Sift the flour, baking powder and salt on top.


5. In a second bowl, beat the eggs and vanilla extract together.


6. Add the beaten egg and vanilla, and stir until well combined.

7. Spoon the mixture into the prepared tin.

8. Bake in the oven for 1 and a half or 2 hours. You'll know it's done when a skewer comes out clean.

9. When baked, leave to cool in the tin for 20 minutes before running a knife inside the edges to lever the cake carefully out onto a wire rack.

10. Place the cake on a clean cloth, before piercing a few holes with the skewer into the top of the cake, and pouring the alcohol in.


for the optional topping:

apricot jam
2 teaspoons lemon juice
60ml water
walnuts, hazelnuts, almonds, pistachio nuts
glace cherries
glace ginger
candied peel
marron glaces
anything else you fancy

11. Heat the apricot jam, lemon juice and water in a saucepan over a medium heat. Boil for 10-15 minutes, before forcing through a sieve or wire strainer. Brush the liquid glaze over the top and side of the cake.

12. Place the topping fruit and nuts over the top of the cake, press down firmly before brushing with more glaze. Leave to cool and set.


13. Carefully wrap the cake in greaseproof paper, and then in cling film or kitchen foil. Store in an airtight cake tin.


This cake was idly baked while listening to Arcade Fire's album The Suburbs.

Saturday, 10 December 2011

Gluten Free, Nut Free: Salted Caramel Meringue Kisses

These are the first meringues I've ever made, and quite frankly they are a doddle. If you've a working electric whisk then half the battle is won. Dinky, sweet and tasty, they make great presents to give for Christmas. I've frozen them, unfilled, to defrost on Christmas Eve and then spread with salted caramel or lemon curd. The great thing about these meringues for anyone with allergies is that they're naturally flour and nut free. If you'd like to make them dairy free too then you could replace the salted caramel with raspberry jam.


Adapted from the meringue recipe by Joanne Wheatley on the BBC Food Website. See her recipe here

Makes about 40 mini meringues, so 20 filled kisses


3 egg whites, room temperature
1 teaspoon lemon juice
150g caster sugar

1. Turn the oven low, to 110C (90C fan ovens).

2. Line baking sheets or trays with non stick baking paper (you may need to do this in shifts if you only have one baking sheet or tray). Lightly brush the baking paper with vegetable oil.

3. Whisk the egg whites and lemon juice in a large bowl until they form stiff peaks.

4. Next add one third of the caster sugar, and whisk again until smooth and glossy.

5. Fold in the rest of the sugar.

6. Spoon the mixture into a piping bag with a small fluted or plain round nozzle, and pipe small rounds onto the baking paper, allowing space between each one.

7. Bake in the oven for approx 2 hours, then take out and leave to cool totally on a wire rack.


8. Store in an airtight container until needed, or wrap carefully in clingfilm and freeze in freezer bags, removing from the freezer 2 hours before filling and serving.


For the kiss filling: 
shop bought jar of salted caramel

9. To serve, spread the flat side of half the meringues with about a teaspoon of salted caramel, then sandwich together. If you prefer you could spread them with lemon curd and whipped cream instead.

10. To give these meringue kisses as presents, present them in mini cupcake cases, in pretty boxes or bags.


These meringue kisses were idly baked to the soundtrack of the film Broken Flowers.

Tuesday, 22 November 2011

Lemon Curd Cupcakes


My gorgeous lemon curd cupcakes make the ideal store cupboard bakes. At this time of year, when our fruit cages are bare, all I need is some shop bought lemon curd and one solitary lemon to make these simple cupcakes sing. Very moreish, very pretty, and with a pleasingly generous dollop of curd inside the heart of each cake.


Recipe
My own, makes 12 medium muffin-sized cupcakes

for the base:
125g self raising flour
1 tsp baking powder
125g unsalted butter, room temperature
2 large eggs
125g light muscovado sugar
finely grated zest of 1 small lemon
1 tablespoon lemon juice


1. Turn the oven to 180 (160 fan) and place medium cupcake cases in a 12 muffin baking tray. Cream the butter and sugar in a large mixing bowl, until smooth and fluffy.

2. Throw in the eggs one at a time and beat in, adding a spoonful of flour after each one. Then stir in the lemon zest and tablespoon of freshly squeezed lemon juice.

3. Next sieve the flour and baking powder into the mixture, stirring gently until the batter is well combined.

4. Spoon the batter into each cupcake case, until they are approximately two-thirds full (you want to leave enough room for the cakes to rise).

5. Place in the oven for 20 minutes. You'll know the cakes are done when a skewer comes out clean.

6. Take out of the oven and leave for a few minutes, before moving the cupcakes in their cases to a wire rack or plate to cool.


for the filling:
approx 180g lemon curd

7. Once the cupcakes are cool, use an apple corer or a sharp knife to remove the centre of the cake, then fill the hole with lemon curd.

8. When all the cupcakes have been filled, spread a little extra lemon curd over the top of each.


for the icing:
225g unsalted butter, room temperature
425g icing sugar
50ml milk
1 teaspoon lemon juice
food colouring tint paste (I used Primrose, both by Sugarflair)
wafer butterflies, sugar flowers or lemon peel curls to decorate, optional

8. Beat the butter until creamy. Stir in the milk and mix together. 

9. Sift half the icing sugar into the mixture, and stir thoroughly, before adding the other half and continuing to stir until it is a thick paste. Take care stirring the icing sugar, as this is a bit messy, I tend to wear an apron as I've been known to accidentally drench myself in it when stirring too vigorously!

10. When the icing is combined, the only thing left to do is to colour it. With colour tint pastes you only need to add a pin prick amount before stirring it in to give the icing a beautiful pastel colour.

11. Get a pint glass and place a piping bag with a nozzle inside the glass, so that the nozzle is on the bottom of the glass. Fold the piping bag edges over the glass rim. Spoon the paste into the piping bag, then carefully take the bag out of the glass and twist the end of the bag so that the icing is well contained.

12. Pipe the icing over the cupcakes and decorate with sugar flowers or wafer butterflies, lemon peel curls or anything else you fancy. To pipe a rose, you start piping in the middle of the cupcake and work outwards. To pipe a classic swirl, you start piping at the outer edge of the cupcake and work inwards.


These cupcakes were idly baked to the sound of the Mazzy Star album She Hangs Brightly 


Sunday, 28 August 2011

Mini Cupcakes - Chocolate and Rose Flavours

There is something absolutely addictive about these mini cupcakes. Perhaps it's because they taste soooo good and each one is just a mouthful, prompting the thought 'well there's no harm in having just one more'. Perhaps it's because they look so daintily pretty, like something out of a 1950's tea party with their little buttercream tops resembling flowers or sweet sea anemones. Whatever the reason, these little babies are extremely popular. When I served them for a 60th birthday party this week they didn't last long!


Recipe
Makes 35, so serves approx 15 (2 or 3 mini cupcakes per person)
Base and icing recipe adapted from the one given on website Forkd by the intruigingly named lukkie_shipwreck. See her recipe online here. 
Chocolate icing recipe adapted from Xanthe Milton's one for Easter Nest Cupcakes in her gorgeous book Eat Me. Buy the book on Amazon.

for the batter:
125g unsalted butter, room temperature
2 large eggs, room temperature
125g self raising flour
125g golden caster sugar
1 teaspoon baking powder
1 teaspoon vanilla extract
3 tablespoons milk

for the chocolate batter flavour:
30g dark chocolate (70% solids)
1 tablespoon cocoa powder

for the rose batter flavour:
half a teaspoon rose water
grated zest of half a small unwaxed lemon


1. Turn oven to 190C (170C fan ovens). Fill several mini muffin pans with mini cupcake cases.

2. In a large bowl, throw in all the batter ingredients except the milk, and beat well until combined.

3. Next add the milk, and stir again.

4. To make the two flavours, place half the batter into a second large mixing bowl.

5. To make the chocolate batter, melt the chocolate over a low heat in a saucepan before leaving to cool for a moment. Add the cocoa powder to the batter in the first bowl, and stir carefully. Then pour in the melted chocolate and continuing stirring gently until the batter is smooth and combined.

6. To make the rose batter, stir the rose water and grated lemon zest into the batter in the second bowl.

7. Use a teaspoon to carefully spoon the chocolate batter into the cases, and then the rose batter. Fill the cases until they are two thirds full. My 2 mini muffin trays hold 12 cupcakes each, so I filled them and baked the cupcakes in several batches, covering the leftover batters under plates and cooking the final batch when the first had come out of the oven.

8. Place the mini muffin trays into the oven and bake for 14-15 minutes. You'll know they're done when a skewer comes out clean.

9. When done, leave the cupcakes for a couple of minutes before placing them on a wire rack to cool, and put the next batch of cupcakes to bake in the oven. When all are baked, leave them to cool on the rack and you can get on with the icing.


for the rose icing:
300g icing sugar, sifted 
150g unsalted butter, room temperature
half a teaspoon rose water
pink food colouring tint paste

7. Combine the butter and icing sugar. Stir in the rose water and mix together. Add a pin prick of colour tint (I used Dusky Pink by SugarFlair), and gently stir it in.

8.  Get a pint glass. Place a piping bag with a star nozzle inside the glass, so that the nozzle is on the bottom of the glass. Fold the piping bag edges over the glass rim. Spoon the rose icing into the piping bag, then carefully take the bag out of the glass and twist the end of the bag so that the icing is well contained.

9. Pipe the icing over the rose cupcakes and add any sprinkles or sugar flowers you fancy to decorate.

for the chocolate icing:
1 tablespoon cocoa powder
42g dark chocolate, broken into pieces
142g icing sugar, sifted
half a teaspoon vanilla extract
60ml double cream
170g unsalted butter, room temperature

10. Melt the chocolate over a low heat, and then leave to cool.

11. Mix the icing sugar and cocoa powder in a large bowl. When combined, beat in the butter.

12. Add the vanilla extract, cream and melted chocolate to the icing, and whisk briskly for at least 3 minutes until smooth and the colour has lightened.

13. Follow the same method as before for icing the cupcakes, using a second piping bag, and piping the icing onto the chocolate cupcakes before adding any decoration you like.


These mini cupcakes were idly baked while listening to Roberta Flack's album Killing Me Softly

Wednesday, 24 August 2011

Dairy Free Summer Berry Bundt Cake

This bundt cake is a great cake to bake when you need to feed lots of people, and looks thoroughly celebratory filled with a riot of bright summer berries. It's called a bundt cake because it's baked in a special ring shaped tin, which is a sort of decorative mould with fluted sides. This dairy free recipe can also be made gluten free if you simply swop the plain flour for a gluten free one, and use gluten free baking powder instead of the cream of tartar. The lightness of this lovely recipe is mirrored by the delicate marbling of yellow and white in its crumb, and the sweet taste allows the tangy berries to take centre stage. A beautiful cake to make in the last sunny days before summer's end.


Recipe
Serves 12
Adapted from Sophie Grigson's great seasonal cookery book, Country Kitchen. Buy the book on Amazon here.

9 large egg whites
4 large egg yolks
1 tsp cream of tartar
150g plain flour
250g caster sugar
2 pinches salt
2 tsps vanilla extract
3 tsps finely grated lemon zest

1. Turn the oven 190C (170C fan ovens), and grease and flour a 25cm bunt tin or ring mould. Grigson says to leave it ungreased and unfloured, but trust me, after all the faff, prodding and elbow grease it took for me to prise this baked cake out of the bundt tin, you will want to prep it to avoid it sticking as it did with me! Perhaps a springform ring mould would be an easier baking option.

2. Put out 4 large mixing bowls. Sift the flour at least four times, using 2 of those bowls. In the third bowl, whisk the 9 egg whites and the cream of tartar and salt together until they form soft peaks.

3. Add most of the sugar to the egg white mixture, leaving aside just 2 tablespoons of sugar for later. Pour in the vanilla extract and whisk until the mixture is thick and shiny.

4. Fold in a third of the sifted flour to the egg whites, gently mixing it in until combined, then add the second part of it, mixing well, then the third part, until all the flour is stirred in.

5. In the fourth large bowl, beat the egg yolks and the reserved 2 tablespoond of sugar until yellow and thickened.

6. To the thickened egg yolk, stir in a third of the egg white mixture, and the lemon zest. 

7. Using a large spoon, place dollops of the egg white mixture into the prepared bundt tin, alternating it with dollops of the egg yolk mixture, so that the two nestle side by side and ontop of eachother in the tin.

8. Once all the egg white and the egg yolk mixtures are in the tin, place it in the oven for approx 35 minutes until a skewer comes out clean.

9. When the cake is done, gently turn the tin upside down and leave it to cool in the tin on a wire rack. Once totally cool, use a spatula or a fork to gently prise the cake away from the tin sides. This is where I had difficulty, hence the scuff marks you can see at the bottom of my cake where it stuck to the tin.


for the icing:
approx 250g icing sugar
2 tbsps lemon juice
1 or 2 punnets of mixed berries: raspberries, blueberries, or strawberries, all washed

10. For the icing, just mix the lemon juice into the icing sugar and beat with a fork until well combined and the consistency you want.

11. Pour the icing over the cake, and then fill the hole in the centre of the cake with berries, layering them also over the top if you like. Dust the berries with a little icing sugar and let the icing dry for half an hour before serving.


This cake was idly baked to the sounds of Karen Elson's album The Ghost Who Walks

Sunday, 14 August 2011

Lemon Curd Layer Cake

This sweet and zesty lemon curd layer cake is a lovely alternative to the oft baked lemon drizzle. In contrast to the popular drizzle, lemon curd is rather neglected by bakers, which seems a shame considering it makes as delicious a filling for layer cakes as jam or cream. Give it a try if you fancy something different.


Recipe
Serves 8 - 10
Adapted from the recipe by Deila Smith given at BBC Food Online. See the recipe here.
Being an idle sort, I advocate the buying of lemon curd, but I include Delia's lemon curd recipe for those who would like to make their own.

For the base:
1 tbsp lemon juice
Zest of 1 lemon, grated
1 tsp baking powder
175g self raising flour
175g butter
175g caster sugar
3 eggs

1. Turn the oven to 170C (150C Fan), and line and grease two 18cm sandwich tins.

2. Cream the butter and sugar until fluffy, then add the eggs and beat well.

3. Add the lemon juice and grated lemon zest.

4. Sieve in the flour and baking powder and mix well until the batter is creamy and smooth

5. Pour the batter evenly into the two prepared tins, and bake in the oven for 35 minutes. You'll know they're done when a skewer comes out clean and the tops bounce back under your finger.

6. Leave the cakes to cool in their tins for 20 minutes, before turning out onto a wire rack or 2 plates.


for the lemon curd:
either Short bought locally made lemon curd
or 1 large lemon, grated zest and juice only
75g caster sugar
50g butter
2 eggs

7. If you're lazy like me, then buy a lovely local lemon curd and save yourself some bother.
If instead you fancy making your own, then put the sugar and lemon zest in a bowl and put to one side.

8. In a separate bowl, beat the eggs and lemon juice together. Then add them to the sugar and lemon zest and mix well.

9. Chop the butter into little pieces and then add it to the mixture.

10. Stir the curd in the bowl over a bain mairie, which is a pan of almost simmering water, for about 20 minutes until the mixture is thickened. Remove bowl from pan and leave to cool.

11. Either way, when the cakes are totally cool, spread the lemon curd generously over the bottom cake, then place the second cake ontop.


for the icing:
zest of 1 large lemon
50g sifted icing sugar
2-3 tsp lemon juice

12. To make the icing, sift the icing sugar and stir in the lemon juice, whisking until it forms a smooth icing.

13. Spoon the icing over the top cake, and spread it letting it drip down the sides. Finely grate the lemon zest over the icing and leave to firm at least 30 minutes before serving.


This cake was idly baked to the sounds of Pulp's album Different Class.  

Saturday, 30 July 2011

Apricot & Almond Birthday Cake

This simple and gorgeous recipe doesn't have to be saved for birthdays, but when I baked it earlier in the week to give my dear friend Kate a birthday tea it went down a treat. Fresh ripe apricots give the delicious cake real oomph and juiciness. This is supposed to feed 8, but Kate, Mr Eve and I managed to eat three quarters of it within the space of a few games of bananagrams. What can I say, the combination of old friends, bananagrams and apricot and almond cake is more than a tad addictive.


Recipe
Serves 8

Adapted from Nigel Slater's lovely Cake for Midsummer recipe, from his website. See the recipe here. I swopped his raspberries for extra apricots, and gave it a great zesty tang to balance the sweetness of the fruit by adding the finely grated zest of half a lemon.

For the base:
8 small apricots (maximum 400g), halved, stoned and chopped into small pieces
zest of half a small lemon, finely grated
175g butter
175g plain flour
175g caster sugar
1 teaspoon baking powder
100g ground almonds
2 tablespoons milk

1. Turn the oven to 180C (160C fan ovens). Grease and line a 20cm cake tin.

2. Mix the butter and sugar together in a large bowl until pale and smooth.

3. Add the first egg, and beat well before adding the second into the mixture. Beat again, before throwing in the ground almonds and grated lemon zest.

4. Next sieve in half the flour and the baking powder, and stir gently with a metal spoon until well combined.

5. Sift in the rest of the flour, after which spoon in the milk. Continue stirring gently and then add the chopped apricots, mixing into the the batter briefly.

6. Pour the batter into the prepared baking tin and place in the oven for approx 40 minutes. You'll know it's done when the top bounces back under your finger, and a skewer comes out clean.

7. Leave the cake to cool for 10 minutes in the tin, before turning it out onto a wire rack or plate.


For the topping:
1 or 2 tablespoons icing sugar
2 small apricots

8. When the cake has cooled, sieve the icing sugar ontop, perhaps also tying a ribbon in a bow around the cake for decoration.

9. Halve and quarter a couple of extra apricots, and place the quarters in a circle over the cake.


This cake was idly baked to the sounds of John Coltrane's album Blue Train


Monday, 25 July 2011

Gluten Free Rose & Lemon cupcakes

This simple recipe is my own creation, and I'm very pleased with it. The rose and lemon evoke turkish delight in delicate cupcake form. I should say that cupcakes satisfy the girly, romantic side of me, there's something so wonderfully, enjoyably frivolous about them. They're very quick to make and lots of fun to eat, just watch out for the sugar rush as you take your first mouthful of the cream cheese icing! These are both gluten free and nut free. If you'd like to go a step further and make them dairy free as well, then replace the butter in the cake batter with a dairy free margarine, and leave out the cream cheese icing, opting for a simple drizzle made from icing sugar and a few tablespoons of rose water or lemon juice instead.


Recipe
Makes 12 medium muffin-sized cupcakes

125g gluten free self raising flour (Dove's Farm recommended)
1 teaspoon gluten free baking powder (Barkart recommended)
125g unsalted butter, room temperature
2 large eggs
125g caster sugar
finely grated zest of 1 small lemon
1 tablespoon rose water

1. Turn the oven to 180 (160 fan) and place large cupcake cases in a 12 muffin baking tray. Cream the butter and sugar together in a large mixing bowl, until smooth and fluffy.

2. Add the eggs one at a time and beat in. Then pour in the lemon zest and tablespoon of rose water, stirring well.

3. Next sieve the flour and baking powder into the mixture, stirring gently until the batter is combined.

4. Spoon the batter into each cupcake case, until they are approximately two-thirds full (you want to leave enough room for the cakes to rise).

5. Place in the oven for 20 minutes. You'll know the cakes are done if a skewer comes out clean.

6. Take out of the oven and leave for a few minutes, before moving the cupcakes in their cases to a wire rack or plate to cool.


for the icing:
1 or 2 teaspoons of rose water
100g butter
100g cream cheese
410g icing sugar
food colouring tint pastes (I used Dusky Pink and Grape Violet, both by Sugarflair)

7. Combine the butter and cream cheese. Stir in the teaspoon or 2 of rose water and mix together. 

8. Sift half the icing sugar into the mixture, and stir thoroughly, before adding the other half and continuing to stir until it is a thick paste. Take care stirring the icing sugar, as this is a bit messy, I tend to wear an apron as I've been known to accidentally drench myself in it when stirring too vigorously!

9. When the icing is combined, the only thing left to do is to colour it. If you're making more than 1 colour icing as I was, then divide the icing into 2 bowls and colour each accordingly. With colour tint pastes you only need to add a pin prick amount before stirring it in to give the icing a beautiful pastel colour.

10. Get a pint glass (or 2 if you're icing 2 different colours, in which case just follow the same method for each individual colour). Place a piping bag with a nozzle inside the glass, so that the nozzle is on the bottom of the glass. Fold the piping bag edges over the glass rim. Spoon the paste into the piping bag, then carefully take the bag out of the glass and twist the end of the bag so that the icing is well contained.

11. Pipe the icing over the cupcakes and add any sprinkles or sugar flowers you fancy to decorate. To pipe a rose, you start piping in the middle of the cupcake and work outwards. To pipe a classic swirl, you start piping at the outer edge of the cupcake and work inwards.


These cupcakes were idly baked to the sounds of David Bowie's Singles Collection, the Space Oddity and Ziggy Stardust years.

Friday, 3 June 2011

Raspberry, Lemon & Almond Cake

So, it's time to say goodbye to Spring. The bluebells in the wood, spread out over the last month as a bright ocean of blue, have now receded to sleep for another year. The image of them in full bloom has imprinted itself in my memory, an image of hope and renewal to be treasured at times when life feels hard.


Of all the cakes I made this spring, my favourite creation was my simple raspberry, lemon and almond cake. Muddled together from a hotchpotch of ingredients, and with a tentative novice's hand, it turned out far better than I had hoped. Infact we gave it such a rave review that a friend requested a slice be sent over to London for her to taste. I posted it next day delivery with a large scrawled FRAGILE over the envelope, but still thought that by the time she opened it she would find only almond crumbs and a few broken raspberries. Not so! Apparently it arrived very much intact, and just as delicious. What a hardy little cake.

Recipe
Serves 8

For the cake:
1 carton of fresh raspberries, washed
1 tsp almond extract
3 large eggs, room temperature
180g unsalted butter, room temperature
225g plain flour (or gluten-free mix flour)
1 teaspoon baking powder (or gluten-free mix powder)
180g caster sugar
Grated rind of half a lemon
2 tablespoons milk (anything except skimmed)


1. Turn the oven to 180C (or 160C for fan ovens). Butter, flour and line a 23x7cm round tin.

2. In a large bowl, cream the butter, sugar, almond extract and lemon rind together until mixture is fluffy and light.

3. Gradually add the eggs to the butter mixture, one at a time. Sift a tablespoon of flour with the 2nd egg, then another tablespoon with the 3rd, folding them into the batter and beat well.

4. Sift in the rest of the flour and the baking powder before adding the milk and raspberries, and mix gently. Being an idle sort, I don't mind if the raspberries sink to the bottom of my cake, but if you'd rather they were distributed more evenly then roll them in a little extra flour before adding them to the recipe.

5. Pour into the tin and bake in the preheated oven for 1 hour until a skewer comes out clean. Cool in the tin for 10 minutes before turning onto a wire rack.


For the glaze topping:
Half a cup of freshly squeezed lemon juice
1 cup caster sugar
1 cup of flaked almonds

1. While the cake is still a little warm, place the flaked almonds evenly on top.

2. Put the lemon juice and caster sugar in a pan, and bring it to the boil over a hob before turning the heat down to a simmer. The glaze is ready when it has been reduced by approximately a third.

3. Using a pastry brush, carefully brush the glaze on to the top and sides of the cake.


This cake was idly baked to the sounds of Laura Marling's album I Speak Because I Can